
Tuesday, June 24, 2008
I'm Back!!!!
But not for instruction ...I need a favor! I just finished getting enough stuff in my new store to promote it! In order to get to the top of the 100 list for ecrater, where my store is, I need to get votes! All you need to do is click on the banner on the right that says Ecrater shop owners top site vote for me. That's it! JUST CLICK ON THE BANNER...PLEAAAAASSSSSSEEEE! and thank you for your help.
Sunday, June 22, 2008
Oh Well...kind of a failure!
I got the box in the mail with the tripod and the screens! It looked promising! I went to my jewelry room and lugged my video camera with me determined to get the footage of me creating a brooch from scratch. Well...I will still show you how to do one, the hard way! My idea of an easy way failed! The screen is woven and so the surface is not level, making it impossible to use for my purpose. Also the holes in the screen are not uniform making it hard to line up the pieces where they need to go. Well, it's back to the drawing board. I will do a quick video of the hard way for you soon. Trying to dedicate all my time to putting items in my new store at ecrater! I just hit the 200 item mark so I took a minute to write this. Back to work!
Thursday, June 12, 2008
Designing and soldering your own creations!
Ganoksin.com : " "
"
This is a website I found today that has a world of information! Unfortunately most of the info is directed to professional jewelry makers that use gold and diamonds! Not that I'm not professional but I am a far distance from making my own diamonds rings! What I did find there was tools! I discovered a soldering screen and a tripod! Now this may mean nothing to you and it meant nothing to me yesterday but TODAY it is the basis for a whole blog entry for making your own brooches etc...
Let me back up a little here...I made my first brooch about a year ago...I have a ton of findings, those metal pieces that are what they make jewelry from...here is an example...

I soldered together some findings and added glass cabochons and beads to make this brooch...
It was my first time ever creating and making a piece of jewelry! I knew I had the soldering down and wanted to take it to the next level...a brooch! So I put the findings down on a board, upside down and began to solder. What a pain! The findings were different heights and , as if that wasn't enough of a problem, they would move around when the heat hit them! It was awful trying to get them to stay in place! I used every idea I could think of including play-do! Yes, kiddie play-do that you can mold. I pressed a square block out and poked the prongs into it and tried soldering. The result was, the findings stayed in place but it burned the play-do onto them and what a mess!
My next effort was with a block of that green clay that you put fake flowers in...worse!
I decided what I needed was some sort of a metal mesh screen...like for the windows only bigger holes. Maybe a strainer from the kitchen? No holes too far apart...got stuck there for a while now...months.
Ok...so here is where that place with the tools comes in! They make a soldering screen and a thing to put it on so you can solder from under neath if you want! I don't think it is made for my intentions...but it is perfect for my intentions! I ordered it...here is what it looks like...


soooooo as soon as it arrives we can have a second lesson on making your own creation!! See you then!
"This is a website I found today that has a world of information! Unfortunately most of the info is directed to professional jewelry makers that use gold and diamonds! Not that I'm not professional but I am a far distance from making my own diamonds rings! What I did find there was tools! I discovered a soldering screen and a tripod! Now this may mean nothing to you and it meant nothing to me yesterday but TODAY it is the basis for a whole blog entry for making your own brooches etc...
Let me back up a little here...I made my first brooch about a year ago...I have a ton of findings, those metal pieces that are what they make jewelry from...here is an example...

I soldered together some findings and added glass cabochons and beads to make this brooch...

It was my first time ever creating and making a piece of jewelry! I knew I had the soldering down and wanted to take it to the next level...a brooch! So I put the findings down on a board, upside down and began to solder. What a pain! The findings were different heights and , as if that wasn't enough of a problem, they would move around when the heat hit them! It was awful trying to get them to stay in place! I used every idea I could think of including play-do! Yes, kiddie play-do that you can mold. I pressed a square block out and poked the prongs into it and tried soldering. The result was, the findings stayed in place but it burned the play-do onto them and what a mess!
My next effort was with a block of that green clay that you put fake flowers in...worse!
I decided what I needed was some sort of a metal mesh screen...like for the windows only bigger holes. Maybe a strainer from the kitchen? No holes too far apart...got stuck there for a while now...months.
Ok...so here is where that place with the tools comes in! They make a soldering screen and a thing to put it on so you can solder from under neath if you want! I don't think it is made for my intentions...but it is perfect for my intentions! I ordered it...here is what it looks like...


soooooo as soon as it arrives we can have a second lesson on making your own creation!! See you then!
Wednesday, June 11, 2008
More on soldering
I had a comment in yesterdays post about "what is flux". The comment asked if the flux is what you melt onto the metal. I think what they mean is the solder. There is solder that looks like bear wire then there is flux which is a gooey looking substance that is used to clean the metal before the joining of the metals. Many solders have flux in them trying to eliminate the need of the extra step, but believe me, with jewelry repair you need to always use the flux! Even if there is flux in your solder! The reason is the need for the less amont of heat possible. Most soldering is done completely different. It is about heating the metal parts to a temperature so hot that just touching the solder to the metal will melt it without the need of the gun melting it. Actually, you use the gun or a torch to accomplish heating up the metal parts to that extreme temperature. With jewelry the trick is quick and short timed heat. You want to heat it quick and as little as possible and still make it stick. The flux is to clean the metal but more or less acts like a glue as well. It allows the soldr to flow quicker and then hold stronger. When you shop for the flux and solder you want rosin core 60/40 solder in the smallest gauge, or skinniest looking wire. And the flux can come in a liquid or a paste. Both are good but I find the paste the easiest to clean up afterwards.
Tuesday, June 10, 2008
Soldering jewelry
Once you learn how to solder a whole new world opens up to you! You will know when you finally conquer it...you will feel it. There is alot to soldering that comes with experience that I can't explain in one lesson...like knowing when to turn the heat down and what that accomplishes. How to flow into a large area and fill it, etc...Below is a hatpin I soldered together from about 10 different pieces...all the leaves were single, the flowers, the angels, etc. Some metals are harder than others to solder. The easiest is copper, then brass, then sterling, then regular metal (steel?) and the hardest is pot metal and gold. I do all but the gold. I have never tried gold because it takes special equipment and I have never had anyone to show me.


soldering takes alot of practice! And you don't want to practice on something you care about! It is possible to melt the piece of jewelry if it is not done right. The iron I use is a station that has several settings.

I find myself always using the high setting though.
The way I am about to show you is very unconventional! The way you are suppose to do it properly, is take out all the stones, heat the metal so hot that when you touch the solder to it it will melt! I rarely get jewelry that I need to do all that to. Plus it is a risk of melting the old metals, like pot metal. If you have pot metal, don't try to solder, give it to an expert because you can easily melt the metal.
But for most pieces the instructions I am about to give you work well. You need not worry about the stones being damaged. The trick is to heat quick and get out!
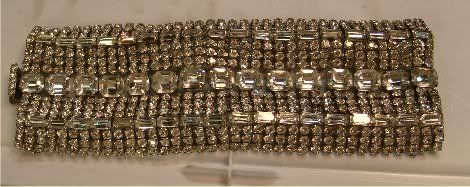
Below is the bracelet I did so many repairs on with the stones in it...

as you can see the stones stayed safe...
I am going to use a single earring that has all the stones in it. I am going to make a brooch out of it.


First cut the clip off the back...

Use the solder that is the thinnest gauge. That means the skinny looking wire. Usually the common type they use for electronics.

Then get a flux that is paste. Make sure you have a wet sponge on hand! This is very important!!!! You need to plug in the gun, let it get hot then Wipe it off on the sponge
This will clean the tip. The tip must be clean for it to work.


If your tip is still not getting hot enough...try tightening it or turning it off and pulling the tip out then take some fine sand paper and rough up the end that connects to the gun and resubmit the tip into the gun.
Ok...after you clean the tip. The pieces you want to solder must be primed.
That means take a nail file and sand off the parts that will touch after you solder them together. If it is a brooch back then sand the part where the brooch broke off and sand the pin back that you will be attaching to it.

This is important for it to work right. Now take a gob of flux and apply to the parts of both pieces that you just sanded.

Then get your gun and melt a small piece of solder onto it.
Touch the gob of solder with the tip of the gun until you see the solder melt onto the piece. Do this to both pieces.


Then put flux on top of the melted solder on both pieces. Put the pieces together and have the held in place with hemostates, a vise, a handy helper with alligator clips
or with pliers. The point here is for them not to move when you touch the gun to them. They need to stay still. Now get more solder on your gun and touch it to the place you want to attach(same place you sanded,primed and fluxed again) as soon as you see it melt onto the metal, stop. Let it cool down and then check to make sure it is straight , even and so forth.


Please try this on things you don't care about first!!!!!
There are so many details that I can't explain that just come with practice...like if you want the solder to flow in a large area, etc... The instructions above are for a quick fix with a one point connection. Earring backs, pin backs, etc...
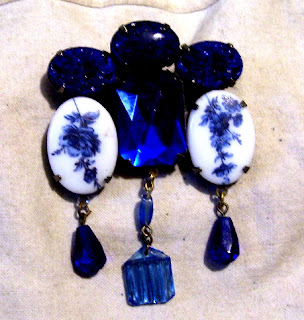
Once you learn you can do lots of things...I made this brooch from scratch! My very first one!


soldering takes alot of practice! And you don't want to practice on something you care about! It is possible to melt the piece of jewelry if it is not done right. The iron I use is a station that has several settings.

I find myself always using the high setting though.
The way I am about to show you is very unconventional! The way you are suppose to do it properly, is take out all the stones, heat the metal so hot that when you touch the solder to it it will melt! I rarely get jewelry that I need to do all that to. Plus it is a risk of melting the old metals, like pot metal. If you have pot metal, don't try to solder, give it to an expert because you can easily melt the metal.
But for most pieces the instructions I am about to give you work well. You need not worry about the stones being damaged. The trick is to heat quick and get out!
Below is the bracelet I did so many repairs on with the stones in it...

as you can see the stones stayed safe...

I am going to use a single earring that has all the stones in it. I am going to make a brooch out of it.


First cut the clip off the back...

Use the solder that is the thinnest gauge. That means the skinny looking wire. Usually the common type they use for electronics.

Then get a flux that is paste. Make sure you have a wet sponge on hand! This is very important!!!! You need to plug in the gun, let it get hot then Wipe it off on the sponge
This will clean the tip. The tip must be clean for it to work.


If your tip is still not getting hot enough...try tightening it or turning it off and pulling the tip out then take some fine sand paper and rough up the end that connects to the gun and resubmit the tip into the gun.
Ok...after you clean the tip. The pieces you want to solder must be primed.
That means take a nail file and sand off the parts that will touch after you solder them together. If it is a brooch back then sand the part where the brooch broke off and sand the pin back that you will be attaching to it.

This is important for it to work right. Now take a gob of flux and apply to the parts of both pieces that you just sanded.

Then get your gun and melt a small piece of solder onto it.
Touch the gob of solder with the tip of the gun until you see the solder melt onto the piece. Do this to both pieces.


Then put flux on top of the melted solder on both pieces. Put the pieces together and have the held in place with hemostates, a vise, a handy helper with alligator clips
or with pliers. The point here is for them not to move when you touch the gun to them. They need to stay still. Now get more solder on your gun and touch it to the place you want to attach(same place you sanded,primed and fluxed again) as soon as you see it melt onto the metal, stop. Let it cool down and then check to make sure it is straight , even and so forth.


Please try this on things you don't care about first!!!!!
There are so many details that I can't explain that just come with practice...like if you want the solder to flow in a large area, etc... The instructions above are for a quick fix with a one point connection. Earring backs, pin backs, etc...
Once you learn you can do lots of things...I made this brooch from scratch! My very first one!


Monday, June 9, 2008
Unique Boutique
I have several websites for selling on right now and need to condense my sites to a realistic time factor. It takes too much time trying to keep all the sites up and products listed. So this is my home page for the selling sites. I will be transferring everything to my sites I have linked below.
Subscribe to:
Posts (Atom)


